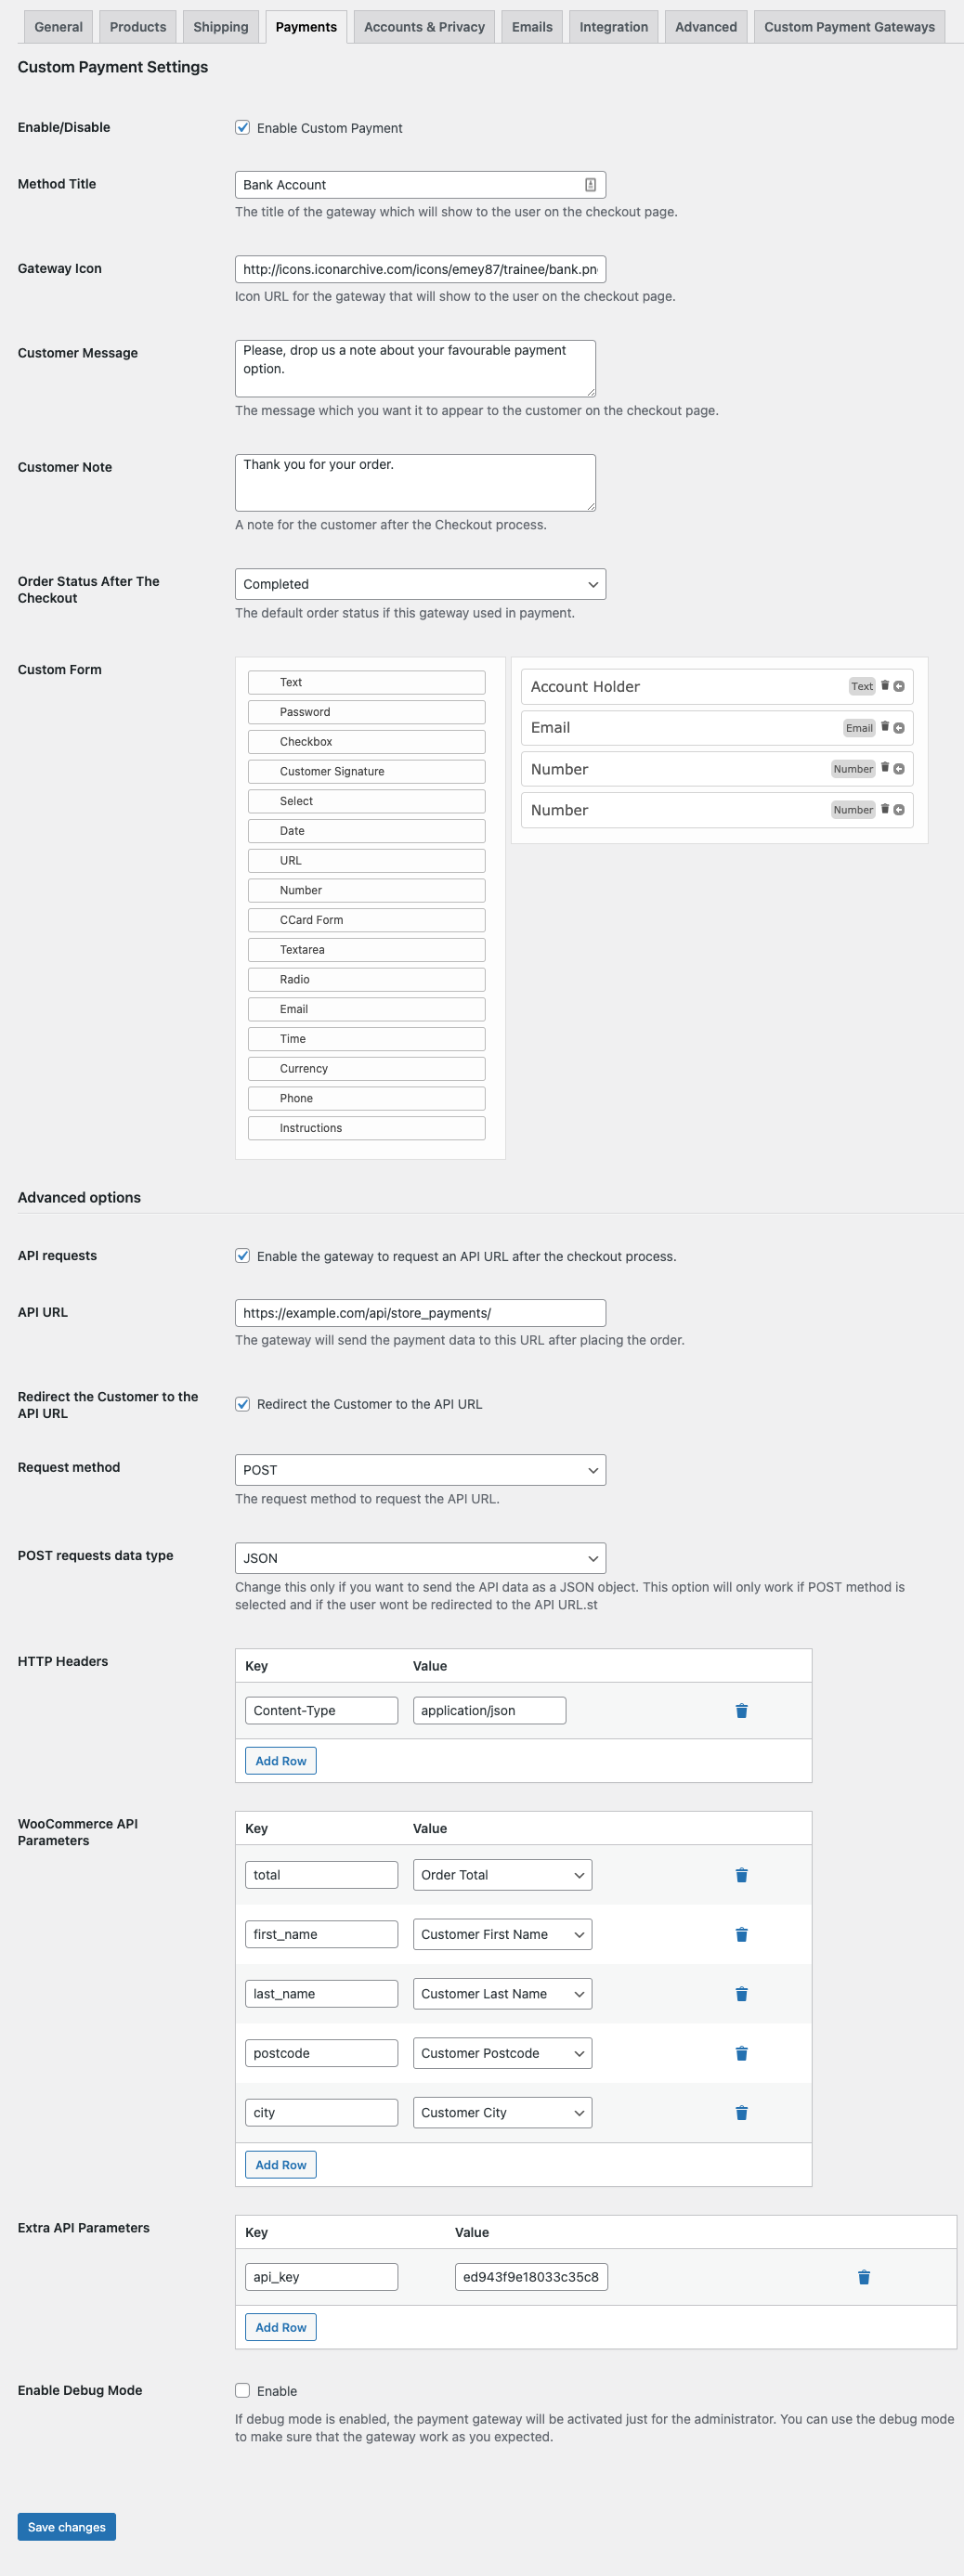
You can find the plugin’s settings in WooCommerce » Settings » Payments » Custom Payment. 
- Once the plugin has been activated, go to WooCommerce » Settings » Payments. The gateway will be listed at the top of the screen, underneath the tabs. Click on ‘Custom Payment Pro’
- Enable/Disable Choose whether to enable the payment gateway or not.
- Method Title Name the payment gateway. This will be visible to customers.
- Gateway Icon * The icon URL for the gateway that will be shown to the user on the checkout page.
- Customer Message The message which you want to appear to the customer on the checkout page.
- Customer Note * A note to the customer after the Checkout process.
- Order Status After The Checkout * The default order status if this gateway is used in payment.
- Custom Form * The checkout form designer.
- API requests * Enable this option if you want the plugin to send the payment data to 3rd party API.
- Redirect the Customer to the API URL* If enabled, the customer will be redirected to the API URL. The API data will also be included with the redirect request.
- API URL * The gateway will send the payment data to this URL after placing the order.
- Request method * The request method to request the API URL.
- POST requests data type* Sometimes you might need to send the API data as a JSON object, this option will allow you to do that. This is only effective if you chose the Request method as POST.
- HTTP Headers* This option will allow you to include any headers information in the request. You can add as many keys/values as you require.
- WooCommerce API Parameters * Add WooCommerce’s order API parameters you want here, such as order’s total, Customer name …. etc.
- Extra API Parameters* Add any extra API parameters you want here, such as API Keys or secret tokens .. etc.
- Enable Debug Mode * If debug mode is enabled, the payment gateway will be activated just by the administrator. You can use the debug mode to make sure that the gateway works as you expected.
* PRO feature
More on WooCommerce API Parameters: #
The original idea behind the plugin is to collect payment data from customers to process them offline. However, we have many customers that using the API Request feature to integrate WooCommerce with other 3rd party payment gateways. It’s important to say that we don’t claim that the plugin can integrate any 3rd payment gateway out of the box. To make the plugin as flexible as possible we added more features for connecting to APIs.
The WooCommerce API parameters are very simple you add a parameter to the request, each parameter has a key and value. For example, if you added Order Total, you can assign a key to it, for example, total_amount then the plugin automatically will assign this key to the Order Total value. total_amount => 35.5 and the same for all of the other values.
Moreover, we created a WordPress filter in order to add any custom API parameters you need.
<?php

add_filter('custom_payment_gateways_api_data', 'add_more_parameters', 10, 2);

function add_more_parameters($wc_parameters, $order_id){

  $wc_parameters['checksum'] = md5($order_id);

  // you can modify/add more parameters but always return the $wc_parameters
  return $wc_parameters;
}
Return URLs #
If you need to redirect the user back to your website and either mark the Order as complete or failed. You need to provide the return URL to your payment provider API. Each provider has different keys for the parameters, you always need to check your payment provider’s API documentation.
At the success or failure URL at the Extra API Parameters option, the key should be as in your 3rd payment gateway documentation and the value should be something like this: https://yourdomain.com/?wc-api=wc_custom_payment_gateway
To process the incoming request from your payment gateway you need to use the custom_payment_process_returned_result action. The following is an example of how to process a failed notifications. Feel free to adjust according to your payment gateway documentation.
<?php

add_action('custom_payment_process_returned_result', 'process_3rd_gateway_orders');
function process_3rd_gateway_orders(){
     // assuming that the 3rd party payment send the status of the payment as 'status' in the request body
     if(isset($_REQUEST['status']) && $_REQUEST['status'] === 'failure'){
        $order = new WC_Order($_REQUEST['order_id']);
        $order->update_status('failed');
        $error = $_REQUEST['error_Message'];
        $order->add_order_note( sprintf( "Payments Failed: '%s'", $error ) );
        wc_add_notice( $error, 'error' );
        wp_redirect( wc_get_checkout_url() );
        exit;
        }
}


